MAC OS 에서 SBS라디오/TV 시청하기
MAC에서 컬투의 라디오나 SBS의 실시간 방송을 보는 방법이 없을까… 고민하셨나요?
MAC OS에서 SBS 고릴라3.0 뷰어를 보는 방법을 소개합니다.
먼저 사파리를 띄워서 SBS 고릴라 웹페이지[http://gorealra.sbs.co.kr/g3/web/introduce.jsp]에
접속합니다.

원하는 채널을 선택하면 아래와 같은 창이 뜨네요.

요기에 Mac OS용 실버라이트를 다운로드 합니다.

다운이 완료되면 해당 실버라이트 패키지를 설치합니다.

Microsoft Silverlight 브라우저 플러그인 설치 화면이 나오고...

약관에 동의하면 설치를 시작합니다.


쭉쭉쭉 설치가 되더니…


방송 재생 성공!!
ㅋㅋ 라디오/보는 라디오/TV채널을 지원하네요. 언젠가 케이블 채널도 모두 지원되겠죠?^^
'Web Tech > Silverlight' 카테고리의 다른 글
| 크롬 42버전에 실버라이트/인터넷 뱅킹 등 NPAPI가 차단되었을때... (0) | 2015.04.24 |
|---|---|
| 실버라이트 4 프로파일링이 되는 VS 버전 (0) | 2010.11.25 |
| 자바스크립트와 실버라이트 상호작용 (0) | 2010.02.08 |
| Silverlight SDK 설치하고 MSDN에 설정하는법 (0) | 2008.11.13 |
| Sliverlight Get Start Install <2008.11.12> (0) | 2008.11.12 |
자바스크립트와 실버라이트 상호작용
1. 자바스크립트(HTML)->실버라이트
[HTML 부분]
- 스크립트 부분
- <script type="text/javascript" >
- function SendSilverlightPlayer(msg) {
- //실버라이트의 함수를 호출
- var silverlightControl = document.getElementById("silverlightPlayer");
- silverlightControl.Content.SilverlightApp.SendToSilverlight(msg);
- }
- </script>
- Tag 부분(Object 선언 부분)
- <object data="data:application/x-silverlight," type="application/x-silverlight-2" width="100%" height="100%" id="silverlightPlayer">
- <param name="source" value="ClientBin/Test.xap"/>
- <param name="onerror" value="onSilverlightError" />
- <param name="background" value="white" />
- <param name="minRuntimeVersion" value="3.0.40818.0" />
- <param name="autoUpgrade" value="true" />
- <param name="enableGPUAcceleration" value="true"/>
- <a href="http://go.microsoft.com/fwlink/?LinkID=149156&v=3.0.40818.0" style="text-decoration: none;">
- <img src="http://go.microsoft.com/fwlink/?LinkId=108181" alt="Microsoft Silverlight 가져오기" style="border-style: none"/>
- </a>
- </object>
[실버라이트 부분]
- 메인 함수 부분
- public MainPage()
- {
- // 변수를 초기화하는 데 필요합니다.
- InitializeComponent();
- HtmlPage.RegisterScriptableObject("SilverlightApp", this);
- }
- 함수 선언 부분
- [ScriptableMember]
- public void SendToSilverlight(string sMessage)
- {
- // HtmlPage.Window.SetProperty("status", sMessage);
- MessageBox.Show(sMessage);
- }
2.실버라이트->자바스크립트
- 실버라이트 함수 호출 부분
- void btnTest_Click(object sender, RoutedEventArgs e)
- {
- ///HTML Javscript 호출 GetProperty("test")
- ///InvokeSelf(param1,parma2,param3);
- ScriptObject myScriptMethod = (ScriptObject)HtmlPage.Window.GetProperty("TransMessage");
- myScriptMethod.InvokeSelf(txtMessage.Text);
- }
- HTML 부분
- <script type="text/javascript" >
- function TransMessage(msg) {
- alert("자바스크립트" + msg);
- }
'Web Tech > Silverlight' 카테고리의 다른 글
| MAC OS 에서 SBS라디오/TV 시청하기 (0) | 2011.08.12 |
|---|---|
| 실버라이트 4 프로파일링이 되는 VS 버전 (0) | 2010.11.25 |
| Silverlight SDK 설치하고 MSDN에 설정하는법 (0) | 2008.11.13 |
| Sliverlight Get Start Install <2008.11.12> (0) | 2008.11.12 |
| 실버라이트 2.0 출시 예정!!! (0) | 2008.10.14 |
Expression Encoder 3

몰랐었는데...
MS의 Expression Encoder 3 가 Expression 1,2,와 달리 가격 정책이 무료로 바뀌었군요.
(H.264와 Smooth Streaming 추가 버전은 유료 49$)
이제는 조금 더 빠른 속도로 Windows Media Encoder를 대체 할 수 있을 것 같네요.
이번 버전의 구성품을 잠시 살펴보면....
이전과 달리 Expression Encoder SDK가 기본으로 포함되어 있구요.
Microsoft Expression 3 Screen Capture 란 녀석이 있는데요.


예전에 WME 보다 더 편리하게 화면 캡쳐를 할 수 있는 녀석인 것 같아 맘에 듭니다.
Expression SDK로 재미있는 것을 하나 만들어 보고 싶은데....
요즘에는 영 시간이 안되네요 에구구구^^
윈도우 미디어에 관심 있으신 분은 꼭 설치 해보세요.
'Media Tech > Expression Encoder' 카테고리의 다른 글
| 익스프레션 인코더 2 SP1의 H.264 지원.. (0) | 2008.09.24 |
|---|
실버라이트 2.0 출시 예정!!!
실버라이트 2.0의 정식 출시가 14일에 될 것으로 알려지고 있습니다.
관심 있으신 분은 확인해보세요.!!
http://silverlight.net/blogs/jesseliberty/archive/2008/10/13/silverlight-2-releases-tomorrow.aspx
오후에 출시 되었군요!!!
실버라이트 닷넷으로 고고씽!!
'Web Tech > Silverlight' 카테고리의 다른 글
| Silverlight SDK 설치하고 MSDN에 설정하는법 (0) | 2008.11.13 |
|---|---|
| Sliverlight Get Start Install <2008.11.12> (0) | 2008.11.12 |
| 실버라이트 한글 폰트 사용하기 (0) | 2008.03.18 |
| 실버라이트 1.1 개발자 레퍼런스 (2) | 2007.08.28 |
| Hoons 닷넷 실버라이트 컨퍼런스 (0) | 2007.08.28 |
익스프레션 인코더 2 SP1의 H.264 지원..
실버라이트의 H.264 지원 계획 글 이후로….
인코딩 소프트웨어인 Expression Encoder 2 서비스 팩 1에서 H.264를 지원하겠다는
계획의 글이 포스트 되었습니다.
관심 있으신 분은 아래의 글을 확인해 보시기 바랍니다.
http://blogs.msdn.com/expressionencoder/archive/2008/09/23/8962401.aspx
'Media Tech > Expression Encoder' 카테고리의 다른 글
| Expression Encoder 3 (1) | 2009.11.05 |
|---|
실버라이트 한글 폰트 사용하기
//폰트 다운이 완료되었다면
void downFont_Completed(object sender, EventArgs e)
{
//다운로더 객체
Downloader downFont = sender as Downloader;
//맑은 고딕 폰트 적용
Font1.SetFontSource(downFont); //폰트 리소스 할당
Font1.FontFamily = "Malgun Gothic"; // "맑은고딕" 이라고 할 경우 인식X
Font1.Text = "맑은고딕: 맑은 고딕 폰드 사용하기.";
}
'Web Tech > Silverlight' 카테고리의 다른 글
| Sliverlight Get Start Install <2008.11.12> (0) | 2008.11.12 |
|---|---|
| 실버라이트 2.0 출시 예정!!! (0) | 2008.10.14 |
| 실버라이트 1.1 개발자 레퍼런스 (2) | 2007.08.28 |
| Hoons 닷넷 실버라이트 컨퍼런스 (0) | 2007.08.28 |
| 실버라이트 운영사양 (2) | 2007.08.28 |
실버라이트 1.1 개발자 레퍼런스
http://download.microsoft.com/download/f/2/e/f2ecc2ad-c498-4538-8a2c-15eb157c00a7/SL_Map_FinalNET.png
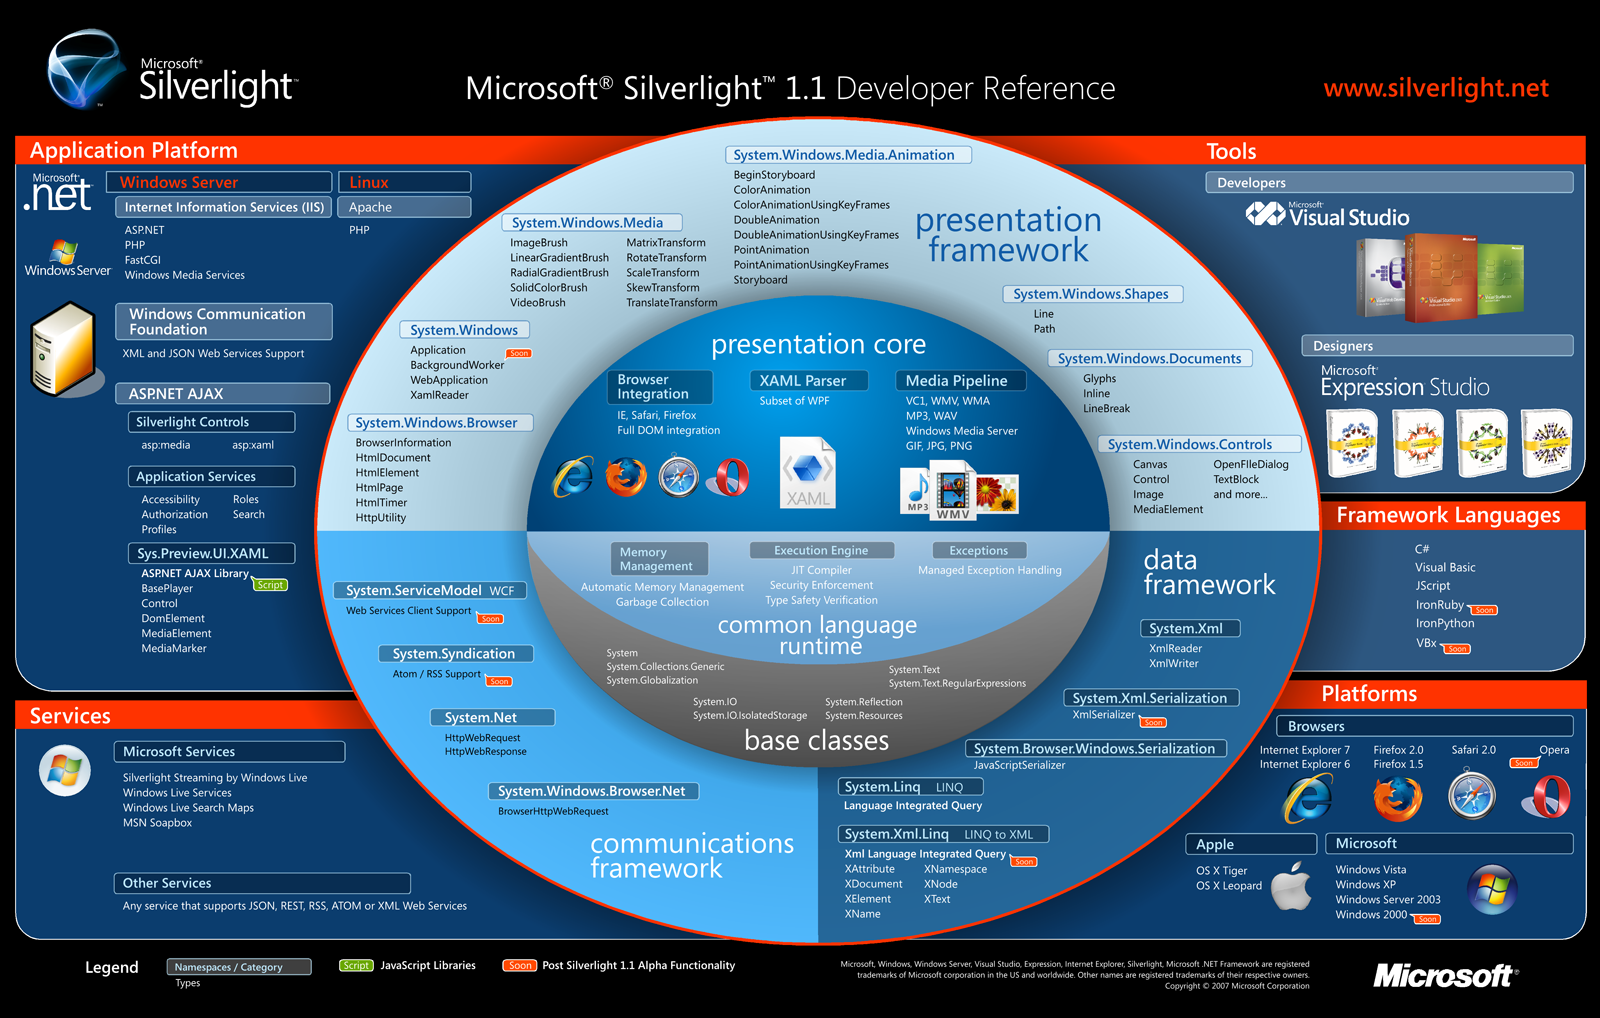
실버라이트 1.1 개발자 레퍼런스
'Web Tech > Silverlight' 카테고리의 다른 글
| 실버라이트 2.0 출시 예정!!! (0) | 2008.10.14 |
|---|---|
| 실버라이트 한글 폰트 사용하기 (0) | 2008.03.18 |
| Hoons 닷넷 실버라이트 컨퍼런스 (0) | 2007.08.28 |
| 실버라이트 운영사양 (2) | 2007.08.28 |
| 광고 같지 않은 광고 SilverLight - RC1 버전 (2) | 2007.08.09 |
Hoons 닷넷 실버라이트 컨퍼런스
좋은 시간 되겠죠?
- 일시 : 2007년 09월 08일(토) 13시 00분
- 장소 : 비트교육센터 지하2층 대강당 (강남역 3번출구)
- 참가비 : 5.000원 현장 납부(본 회비는 비트컴퓨터 강당의 대여료로 사용됩니다.)
- 세미나 대상 : 실버라이트의 실체를 알고 싶은 개발자
- 7회 정기 세미나 신청하기 : http://www.hoons.kr/SeminarJoin.aspx
|
13:00~13:30 |
등 록 | |
|
* 행사 진행및 사회 : 박경훈(HOONS 닷넷 운영자) | ||
|
13:30-14:00 |
실버라이트의 소개와 그 미래 / 황리건 과장 (한국 Microsoft UX 전도사) | |
|
14:00-14:40 |
좌충우돌 익스프레션 블랜드! 처음부터 끝까지 / 최우진 (HOONS닷넷 시삽) | |
|
14:40~15:00 |
휴식 | |
|
15:00~16:10 |
실버라이트의 기초 기술의 토론 / 서금욱 (HOONS닷넷 시삽) | |
|
16:10~16:30 |
휴 식 | |
|
16:30~17:10 |
[Live Coding]UCC 플레이어와 AJAX 데이터 바인딩 / 공도(HOONS닷넷 시삽) | |
|
17:10~17:50 |
[Live Coding]3D 효과의 극장 예매 페이지 만들기 / 서동진(HOONS닷넷 시삽) | |
|
17:50~ |
세미나 뒷담화 (회비 만원+알파) | |
'Web Tech > Silverlight' 카테고리의 다른 글
| 실버라이트 한글 폰트 사용하기 (0) | 2008.03.18 |
|---|---|
| 실버라이트 1.1 개발자 레퍼런스 (2) | 2007.08.28 |
| 실버라이트 운영사양 (2) | 2007.08.28 |
| 광고 같지 않은 광고 SilverLight - RC1 버전 (2) | 2007.08.09 |
| Silverlight Architecture (0) | 2007.08.09 |
실버라이트 운영사양
흘려서 지나치기 쉬운 정보 인데 실버라이트를 지원하는 운영체제와 브라우저
Win98에서는 아직 테스트를 안 해봤지만……과연 지원 할려나?
Windows 98도 빨리 되야 할텐데....
Compatible Operating Systems and Browsers
|
Operating System |
Windows Internet Explorer 7 |
Internet Explorer 6 |
Firefox 1.5 |
Firefox 2 |
Safari |
|
Windows Vista |
Yes |
- |
Yes |
Yes |
- |
|
Windows XP |
Yes |
Yes |
Yes |
Yes |
- |
|
Windows 2000 |
- |
Soon** |
Soon** |
Soon** |
- |
|
Windows Server 2003 (excluding IA-64) |
Yes |
Yes |
Yes |
Yes |
- |
|
Mac OS 10.4.8+ (PowerPC) |
- |
- |
Yes* |
Yes* |
Yes* |
|
Mac OS 10.4.8+ (Intel-based) |
- |
- |
Yes |
Yes |
Yes |
* Silverlight 1.0 Only ; ** Silverlight 1.1 Only
Minimal Requirements
|
Components |
Requirement |
|
Personal Computer |
X86 or x64 500-megahertz (MHz) or higher processor with 128-megabytes (MB) of RAM |
|
Mac OS 10.4.8+ (PowerPC) |
PowerPC G4 800-MHz or higher processor with 128-MB of RAM |
|
Mac OS 10.4.8+ (Intel-based) |
Intel Core Duo 1.83-gigahertz (GB) or higher processor with 128-MB of RAM |
'Web Tech > Silverlight' 카테고리의 다른 글
| 실버라이트 1.1 개발자 레퍼런스 (2) | 2007.08.28 |
|---|---|
| Hoons 닷넷 실버라이트 컨퍼런스 (0) | 2007.08.28 |
| 광고 같지 않은 광고 SilverLight - RC1 버전 (2) | 2007.08.09 |
| Silverlight Architecture (0) | 2007.08.09 |
| 실버라이트 RC1 (0) | 2007.08.06 |
광고 같지 않은 광고 SilverLight - RC1 버전
 invalid-file
왜 냐면 제가 당장 써야하니까요.^^
원본글 : http://uxkorea.net/blog_post_92.aspx
쩝 동영상이 크면 자꾸 업로드가 안되서 동영상은 저화질로 컨버팅했습니다 -.-
'Web Tech > Silverlight' 카테고리의 다른 글
| Hoons 닷넷 실버라이트 컨퍼런스 (0) | 2007.08.28 |
|---|---|
| 실버라이트 운영사양 (2) | 2007.08.28 |
| Silverlight Architecture (0) | 2007.08.09 |
| 실버라이트 RC1 (0) | 2007.08.06 |
| 실버라이트 한글 사용하기 (0) | 2007.08.01 |
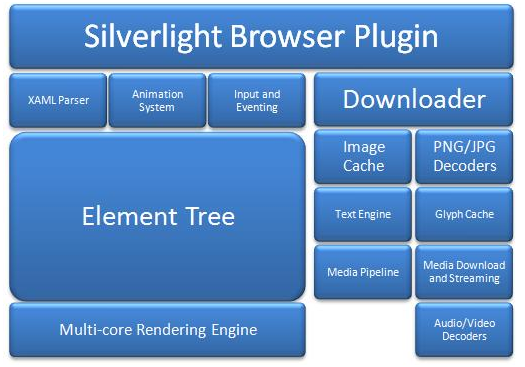
Silverlight Architecture
Silverlight Architecture
The Silverlight run-time allows users to integrate media, vector graphics, text, and images into an interactive application. This document will discuss some of the key components provided in Silverlight 1.0 RC.
'Web Tech > Silverlight' 카테고리의 다른 글
| 실버라이트 운영사양 (2) | 2007.08.28 |
|---|---|
| 광고 같지 않은 광고 SilverLight - RC1 버전 (2) | 2007.08.09 |
| 실버라이트 RC1 (0) | 2007.08.06 |
| 실버라이트 한글 사용하기 (0) | 2007.08.01 |
| Windows 2003에서의 실버라이트 (0) | 2007.07.30 |
실버라이트 RC1
과거의 소스들이 동작하지 않아서 애먹는데.......
아궁 이놈의 소스 노가다....
어쨋든....RC1이후 정식버전에는 이렇게 많이 차이나지 않기를....
'Web Tech > Silverlight' 카테고리의 다른 글
| 광고 같지 않은 광고 SilverLight - RC1 버전 (2) | 2007.08.09 |
|---|---|
| Silverlight Architecture (0) | 2007.08.09 |
| 실버라이트 한글 사용하기 (0) | 2007.08.01 |
| Windows 2003에서의 실버라이트 (0) | 2007.07.30 |
| 실버라이트를 이용하여 RSS 리더 만들기 (0) | 2007.07.25 |
XAML Converter
http://www.highend3d.com/maya/downloads/tools/3d_converters/Maya-To-XAML-3782.html
For 2D: Jonas Beckeman's PSD to XAML Converter
http://flowlabs.net/psd2xaml.aspx
Online converter from 3ds to xaml
http://www.wpf-graphics.com/Converter.aspx
Fred Vandervelde's DWG/DXF to XAML Conversion Toolkit (D2X)
http://www.codeplex.com/Wiki/View.aspx?ProjectName=DWG2XAML
A freely available plug-in that enables Adobe® Illustrator® to export WPF and WPF/E compatible XAML
http://www.mikeswanson.com/XAMLExport/
A free tool that converts Adobe/Macromedia Flash files to XAML
http://www.mikeswanson.com/swf2xaml/
Fireworks to XAML Converter June 1st, 2006
http://www.granthinkson.com/?p=35
XAML/HTML Converter
http://wpf.netfx3.com/files/folders/developer/entry816.aspx
ZAM 3D - 3D XAML Tool (and 3ds & dxf to XAML converter)
http://www.erain.com/products/zam3d/DefaultPDC.asp
LightWave 3D to Xaml Converter
http://blogs.msdn.com/danlehen/archive/2006/07/22/675067.aspx
출저:미래를 그리고 표현하는 Microsoft XAML, 그 한계는 어디인가?
'Application Tech > WPF' 카테고리의 다른 글
| WPF - 흘러가는 TextBlock 하기 : 부하테스트 (0) | 2008.09.08 |
|---|---|
| WPF 위에서 Web 브라우저 컨트롤 사용하기 (0) | 2008.08.14 |
Windows 2003에서의 실버라이트
회사에서는 여차 저차에서 Windows 2003을 사용하는데...
Visual Studio 2007 Beta를 깔고 Expression Blend를 설치하고
이곳저곳에서 받은 샘플 소스들을 돌렸더니....
이런 C# Import 문장에서 부터 오류가 줄줄줄.....
어라 아직 Windows 2003에서는 안되나?
Blend 2는 설치 조차 되지도 않더라..
'Web Tech > Silverlight' 카테고리의 다른 글
| 실버라이트 RC1 (0) | 2007.08.06 |
|---|---|
| 실버라이트 한글 사용하기 (0) | 2007.08.01 |
| 실버라이트를 이용하여 RSS 리더 만들기 (0) | 2007.07.25 |
| 실버라이트 링크 모음 (0) | 2007.07.23 |
| From A to Z... 50 Silverlight Applications (2) | 2007.07.23 |
실버라이트를 이용하여 RSS 리더 만들기
Silverlight Technical Articles
Laurence Moroney
Updated: May 2007
Applies to:
Silverlight
ASP.NET
Summary: Learn how to use Microsoft Silverlight and RSS through ASP.NET to create a simple hero bar that is easily customizable and regenerated. (11 printed pages)
Contents
Introduction
Creating the XAML Template.
Using RSS
Building an ASP.NET Application to Generate XAML from the RSS Document
Managing the URLs
Rendering the Hero Banner in Silverlight
Introduction
We have all seen hero bars on our favorite websites—you know, the banner at the top of the site that rotates around new content and provides direct linkage to it? Did you know that it is easy to create a hero bar with Silverlight? Did you also know that it is just as easy to drive that hero bar content using RSS?
In this article, you'll see how to create a simple one that is easily customizable and can be regenerated simply by editing an RSS document. As such, you can have a hero bar that highlights new blog entries (where your blog is syndicated via RSS), and all you have to do to update the bar is create a new blog entry!
Figure 1 shows an example of a hero bar in action.
.gif)
Figure 1. Viewing a hero bar in Internet Explorer
This article will guide you through the following steps in order to construct a hero bar:
- You will create an XAML template that contains one item and any necessary resources, such as animations (Creating the XAML Template.).
- You will create an ASP.NET application that reads an RSS file and generates XAML using the template in Step 1 (Building an ASP.NET Application to Generate XAML from the RSS Document).
- You will create a second ASP.NET application that reads an RSS file and generates JavaScript code containing the URLs (Managing the URLs).
- You will create an HTML page that contains the Silverlight control, sourcing it from the ASP.NET application in Step 2 and from the JavaScript generator in Step 3 (Rendering the Hero Banner in Silverlight).
Creating the XAML Template
The hero bar in Figure 1 is a 960 × 150 pixel bar containing an image, a headline element with a larger font, and a details element with a smaller font. In XAML, these are collected together into a canvas such as the following:
<Canvas Width="960" Height="150" x:Name="cnvItem0" Opacity="0" MouseLeftButtonDown="javascript:DoClick">
      <Canvas.Background>
         <LinearGradientBrush EndPoint="1,0.5" StartPoint="0,0.5">
            <GradientStop Color="#FF310909" Offset="0"/>
            <GradientStop Color="#FFAE0000" Offset="1"/>
         </LinearGradientBrush>
      </Canvas.Background>

<Image x:Name="img0" Width="344" Height="136"
       Canvas.Left="8" Canvas.Top="8" Source=""/>

<TextBlock x:Name="hdln0" Width="576" Height="40"
           Canvas.Left="376" Canvas.Top="8"
           FontFamily="Tahoma" FontSize="24"
           FontWeight="Normal" Foreground="#FFFFFFFF"
           Text="Headline Text 1" TextWrapping="Wrap"/>

<TextBlock x:Name="detl0" Width="576"
           Height="96" Canvas.Left="376"
           Canvas.Top="48" FontFamily="Tahoma"
           FontSize="14" FontWeight="Normal"
           Foreground="#FFFFFFFF"
           Text="Text Details 1 Describing the stuff inside the hero bar. Clicking anywhere on the bar should take us to the bar details page."
           TextWrapping="Wrap"/>

</Canvas>
Of course, you can use any XAML design that you like, but do take note of the element names. These names are used by the ASP.NET code to fish out the nodes using XPath.
In addition to this, you will likely want an animation that manages the transition between different banners. In the following example, the animation used is a fade in opacity from one element to the next:
<Storyboard x:Name="FadeIn" RepeatBehavior="Forever">
<DoubleAnimationUsingKeyFrames x:Name="Step0"
        Storyboard.TargetName="cnvItem0"
        Storyboard.TargetProperty="(UIElement.Opacity)" >
      <SplineDoubleKeyFrame KeyTime="00:00:00" Value="0"/>
      <SplineDoubleKeyFrame KeyTime="00:00:05" Value="1"/>
      <SplineDoubleKeyFrame KeyTime="00:00:06" Value="0"/>
  </DoubleAnimationUsingKeyFrames>
</Storyboard>
This example uses a DoubleAnimationUsingKeyFrames that fades the opacity of the item from 0 (invisible) to 1 (fully visible) over five seconds, and back to 0 over 1 further second. This will be used as the template for each animation. For example, if you have five elements on your hero bar, you will have five of these storyboards set up—one for each element.
Using RSS
The RSS specification defines an <item> node, which can contain a title, a link, a description, and a resource element such as a graphic or a video in an <enclosure> tag. This example uses images, but there is no reason why you couldn't use a video hero bar by specifying videos in the <enclosure> and using <MediaElement> instead of <Image> within your XAML.
The following is an example RSS document that contains links to Silverlight samples on Channel9, which you can update with any links you like.
<?xml version="1.0" encoding="ISO-8859-1" ?>
<rss version="2.0"><channel>
  <title>W3Schools Home Page</title>
  <link>http://www.w3schools.com</link>
  <description>Free web building tutorials</description>
  <item>
    <title>Red v Blue, starring Scott Guthrie</title>
    <link>http://channel9.msdn.com/playground/wpfe/rvbplayer/</link>
    <description>ScottGu in Red v Blue. Can an executive shoot a gun?
                 Can he do it again?</description>
    <enclosure
        url="http://channel9.msdn.com/playground/wpfe/images/rvbplayer.jpg"
        length="10659" type="image/jpeg" />
  </item>
  <item>
    <title>Updated Grand Piano showing Keyboard input!</title>
    <link>http://channel9.msdn.com/playground/wpfe/grandpiano/</link>
    <description>Your chance to be the concert pianist
                 you always wanted to be...</description>
    <enclosure
        url="http://channel9.msdn.com/playground/wpfe/images/grandpiano.jpg"
        length="6809" type="image/jpeg" />
  </item>
  <item>
    <title>An online WPFE Pad</title>
    <link>http://channel9.msdn.com/playground/wpfe/wpfepad/</link>
    <description>A great little online notepad that allows
                 you to write and test your XAML</description>
    <enclosure
        url="http://channel9.msdn.com/playground/wpfe/images/wpfepad.jpg"
        length="10938" type="image/jpeg" />
  </item>
</channel>
</rss>
If you are using RSS that is generated from your blog (for example), make sure that these nodes are supported. If they are not, you will need to amend your ASP.NET code in order to handle the structure of your RSS document.
Building an ASP.NET Application to Generate XAML from the RSS Document
The first thing you'll want to do is override the HTML output from the ASPX page—you will just want the ASPX page to write out XAML. The most straightforward way is to delete all markup on the ASPX page, except for the first line. For example, if you named your page "GenerateXaml.aspx," your page should have a line like the following:
<%@ Page Language="C#" AutoEventWireup="true"
 CodeFile="GenerateXaml.aspx.cs" Inherits="_Default" %>
You would then want to use code like the following on your Page_Load event handler:
protected void Page_Load(object sender, EventArgs e)
    {
        String strRSSDoc = Request.Params["feed"];
        if (strRSSDoc == null)
            strRSSDoc = Server.MapPath("rssfeed.xml");
        WebClient rssClient = new WebClient();
        Stream data = rssClient.OpenRead(strRSSDoc);
        StreamReader reader = new StreamReader(data);
        String sBuffer = reader.ReadToEnd();
        XmlDocument xmlDoc = new XmlDocument();
        xmlDoc.LoadXml(sBuffer);
        XmlDocument xmlXaml = GenerateXaml(xmlDoc);
        Response.ContentType = "text/xml";
        Response.Write(xmlXaml.OuterXml);
    }
Because this code takes a feed parameter, you can pass in the URI of an RSS document by calling http://server/GenerateXaml.aspx?feed=URI. Or if you omit this parameter, it will read the data from a file called rssfeed.xml in the same directory as the ASPX page.
It then reads this RSS file into an XAML document and calls the GenerateXaml helper function to create a new XmlDocument called "xmlXaml." It then writes the "xmlXaml" contents out to the response stream.
The workhorse of this application is the aforementioned GenerateXaml helper function. It's a big function, so we'll go through it step by step.
The first thing you'll need to do is to create the following:
XmlDocument xmlXaml = new XmlDocument();
xmlXaml.Load(Server.MapPath("template.xml"));

// Set up the namespaces. These are necessary for XPathing an
// XML Document that contains multiple name spaces
// Note: The default namespace does not have a prefix, but
// in order to XPath it, we have to prefix it with one,
// so I use 'd' (for default)
NameTable myn = new NameTable();
XmlNamespaceManager mng = new XmlNamespaceManager(new NameTable());
mng.AddNamespace("d",
        "http://schemas.microsoft.com/winfx/2006/xaml/presentation");
mng.AddNamespace("x", "http://schemas.microsoft.com/winfx/2006/xaml");
When using XAML in ASP.NET with the XML APIs, you need to use an XmlNameSpaceManager to handle the different namespaces. Some elements in Silverlight use the default namespace, while others use the extended namespace prefixed with an "x:" (i.e. "x:Name"). You need to specify a prefix for the namespace manager when using a default namespace, so the "d" prefix is used. For example, when searching for nodes in the default namespace "Image" using XPath, you will refer to it as "d:Image."
Next, you'll get the list of item nodes from the RSS document. To do this, you will use the SelectNodes API to return a NodeList of items.
// The Hero bar items are stored in the RSS 'item' node
//Get a nodelist of the items.
XmlNodeList xnItems = rssFeed.SelectNodes("//item");
Now you'll want to iterate through this list and make copies of the XAML canvas for each node:
for (int lp = 0; lp < xnItems.Count; lp++)
{
  if (lp == 0)
  {
    itemCanvasTemplate =
        xmlXaml.SelectSingleNode("//d:Canvas[@x:Name='cnvItem0']", mng);
  }
  else
  {
    XmlNode xNodeToCopy =
        xmlXaml.SelectSingleNode("//d:Canvas[@x:Name='cnvItem0']", mng);
    itemCanvasTemplate = xNodeToCopy.Clone();
}
Now that you have your node, you’ll want to edit the details, to put the image, headline and text from the RSS Item:
// Now that we have our node, we will customize it with the details taken from the RSS Item.
//First, set up the variables holding the RSS items.
string strItemTitle = xnItems[lp].SelectSingleNode("title").InnerText;
string strItemLink = xnItems[lp].SelectSingleNode("link").InnerText;
string strItemDescription =
    xnItems[lp].SelectSingleNode("description").InnerText;
string strItemPicture =
    xnItems[lp].SelectSingleNode("enclosure").Attributes["url"].InnerText;

// Then, edit the node with these items directly
// 1. Edit the canvas to give it a unique ID
string strCanvasName = "cnvItem" + lp;
itemCanvasTemplate.Attributes["x:Name"].Value = strCanvasName;

// 2. Edit the Image Name and Source
XmlNode xNode =
    itemCanvasTemplate.SelectSingleNode("//d:Image[@x:Name='img0']", mng);
string strImageName = "img" + lp;
xNode.Attributes["x:Name"].Value = strImageName;
xNode.Attributes["Source"].Value = strItemPicture;

// 3. Edit the Headline Textblock name and content
xNode =
  itemCanvasTemplate.SelectSingleNode("//d:TextBlock[@x:Name='hdln0']", mng);
string strHeadlineName = "hdln" + lp;
xNode.Attributes["x:Name"].Value = strHeadlineName;
xNode.Attributes["Text"].Value = strItemTitle;

// 4. Edit the Details Texblock name and content
xNode =
  itemCanvasTemplate.SelectSingleNode("//d:TextBlock[@x:Name='detl0']", mng);
string strDetailsName = "detl" + lp;
xNode.Attributes["x:Name"].Value = strDetailsName;
xNode.Attributes["Text"].Value = strItemDescription;

xmlXaml.DocumentElement.AppendChild(itemCanvasTemplate);
The process for cloning and editing the animation is very similar. You can see this in the code download for this article.
Managing the URLs
One small problem with XAML is that when you specify the JavaScript event handler for the page, you cannot parameterize it. Thus, you cannot put the individual URI for an element in the hero banner into your XAML like this:
MouseLeftButtonDown="javascript:DoClick(MyURI)"
To instead determine the URI, you will have to call a generic DoClick function and use the ID of the canvas that raised the event. A second ASPX page will read the RSS and generate a JavaScript array. The page containing the Silverlight banner can then reference this and the JavaScript event handler will use this JavaScript array.
The following is the C# code to write out a JavaScript array:
XmlNodeList xnItems = xmlDoc.SelectNodes("//item");

Response.Write("var urls = new Array()\n");

for (int lp = 0; lp < xnItems.Count; lp++)
{
  string strItemLink = xnItems[lp].SelectSingleNode("link").InnerText;
  Response.Write("urls[" + lp + "]='" + strItemLink + "';\n");
}
And here is an example of a JavaScript array that it writes out:
var urls = new Array()
urls[0]='http://channel9.msdn.com/playground/wpfe/rvbplayer/';
urls[1]='http://channel9.msdn.com/playground/wpfe/grandpiano/';
urls[2]='http://channel9.msdn.com/playground/wpfe/wpfepad/';
Rendering the Hero Banner in Silverlight
Now that you have all the pieces in place, it is a simple matter to render the hero banner using Silverlight.
The complete code for an HTML page that implements it, along with the JavaScript to handle the URLs follows:
<!DOCTYPE html PUBLIC "-//W3C//DTD XHTML 1.0 Transitional//EN" "http://www.w3.org/TR/xhtml1/DTD/xhtml1-transitional.dtd">
<html  >
<head>
    <title>Untitled Page</title>
    <script type="text/javascript" src="js/silverlight.js"></script>
    <script type="text/javascript" src="js/createSilverlight.js"></script>
    <script type="text/javascript" src="GenerateJS.aspx"></script>
    <script type="text/javascript">
        function DoClick(sender,args)
        {
            var n = sender.name.replace(/cnvItem/,"");
            window.open(urls[n]);
        }
    </script>
</head>
<body>
<div id='slControlHost'>
<script type="text/javascript">
    createSilverlight();
</script>
</div>
</body>
</html>
Notice the reference to the GenerateJS.aspx page is a <script> reference. This will call the GenerateJS.aspx page, which in turn generates a JavaScript array (as in the previous section).
The <Canvas> elements in the XAML specifies that DoClick should handle the mouse left button down, and this function is implemented here. It creates n, a new var. It also sets it to the value of the sender, replacing the string cnvItem with an empty string.
The sender contains the name of the canvas that raised the event, such as cnvItem0, cnvItem1. Replacing cnvItem with an empty string then assigns n to 0 or 1 in these cases. Then, to navigate to a URL specified in the urls array (generated by GenerateJS.aspx), you use Window.Open(urls[n]).
Finally, it sets up the Silverlight control using the call with createSilverlight(). This is present in the createSilverlight.js javascript library that was included at the top of the page. This contains the instantiation code for the Silverlight control that you can see here:
function createSilverlight()
{
    Sys.Silverlight.createObject("GenerateXaml.aspx",
        slControlHost, "slControl1",
        {width:'960', height:'150', inplaceInstallPrompt:true,
         background:'black', isWindowless:'true',
         framerate:'24', version:'0.8'
        },
        {onError:null, onLoad:null},
        null);
}
The first parameter is GenerateXaml.aspx, which generates the XAML as we saw earlier. Silverlight then renders it. As such, you'll now have a hero banner on your page, which you can easily amend using different XAML, and easily update by updating your RSS.
This shows how Silverlight fits nicely into the overall developer ecosystem of Microsoft tools—using RSS, ASP.NET, XAML and Silverlight to mash-up a new application!
'Web Tech > Silverlight' 카테고리의 다른 글
| 실버라이트 RC1 (0) | 2007.08.06 |
|---|---|
| 실버라이트 한글 사용하기 (0) | 2007.08.01 |
| Windows 2003에서의 실버라이트 (0) | 2007.07.30 |
| 실버라이트 링크 모음 (0) | 2007.07.23 |
| From A to Z... 50 Silverlight Applications (2) | 2007.07.23 |
